click for larger image
DISCLAIMER:
I am not responsible for you. I have been working on (and getting hurt by) cars as a hobby, and occaisionally as a job, most of my life. I am assuming common sense (now theres a misnomer), and some auto repair ability here. If you try any of this stuff and hurt yourself, be a man and admit that you shouldn't have done it that way, bandage it up, and try again. Don't go crying to me, or a lawyer for crying out loud. Take some responsibility for your own actions, eh?
THE CAPSULE VERSION:
Panasonic DIN CD/reciever
Custom aluminum dash bezel form fitted to radio and Autometer guages.

1 pair Clif Designs 5.25" components (woofers in doors, tweeters on dash)


1 pair Boss 8" coaxial speakers in behind-seat panel. (until the subs appear)
No amps yet, but...
THE LONG VERSION, WITH 47 8 X 10 GLOSSY PHOTOGRAPHS WITH CIRCLES AND ARROWS, AND A PARAGRAPH ON THE BACK OF EACH ONE, EXPALINING WHAT THE PICTURE WAS ABOUT: (IN HARMONY)
When I got my RX-7, it had no stereo, but the rear panel had been cut for 6x9 speakers (no storage pockets on '79-80), and all the factory wiring was in place. My car had no factory rear speakers, although the grilles are in the rear side poanels, and the sheet metal underneath is dimpled and creased (not cut out, though) to show where they go. It would be fairly simple to cut these locations out and use them. I'm not a big fan of rear speakers, though. I'm in the front, and the music should be in front of me. Ideally, if one has rear speakers, the fronts should be louder than the rears to keep the image of the music in front, as if one were at a concert, facing the stage. The rears act as "fill" or "ambiance" to make the car interior seem larger.
Originally, the car was set up for a shafted radio, and a slightly less than DIN-sized cassette deck below the radio. I wanted a more modern setup, including a DIN radio and a half-DIN EQ. There's plenty of room in the dash, and the way I trimmed mine, one could put the stock shafted radio back in. Basically, I moved my rig down as low in the dash as I could, which allowed me to trim the sheetmetal just short of the shafted radio holes. This allowed me enough room to use a modified American International GM-K444 (Universal big radio GM) dash kit. I had the kit and radio setup from my previous 81 Buick, and I liked the way the kit sandwiched the radio and EQ so close together. The only real mod I made to the kit was to bend up aluminum brackets to match existing screw holes in the dash sheetmetal. I filled the holes in the plastic bezel, and form fitted it to the radio and EQ. Most interior bits are ABS plastic, which one can buy sheets of. With the proper adhesive, it works just like building model airplanes. The ABS cement will melt the pieces and they will "weld" together when it dries. A little glazing putty to fill small surface irregularities (Bondo for the big ones!), sand, and paint. I cheated and used Fleckstone granite-texture paint - hides all manner of sins! looks cool to boot. To fill the two inches of blank platic between the radio and AC controls, I glued on a spare Mazda logo that had both its locator pins broken off. Works nicely!
I decided later that I needed real guages, and a place to put them, so I ditched the EQ (which I wasn't using anyway - passive EQ, no amps), moved the radio up and put the guages between tha radio and the row of switches at the bottom. This, of course required a custom panel, and quite a bit of trimming behind it. The new panel is aluminum cut out using an abrasive waterjet machine. I made several chipboard templates on the machine before everything fit right. The dash structure behind the panel was cut out quite a bit to handle the DIN radio up high (remember it was set up for a small shafted radio), and trimmed a little bit below to clear the guages.
I ran new 16 ga wiring for the front speakers, and since I was using component (separate woofer and tweeter) speakers with the woofer located in the door, I located the component crossover in the recess where the factory 4" speakers used to reside.
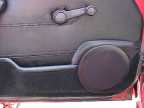
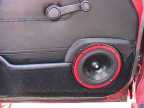
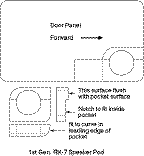
To mount the 5-1/4" mid-woofers from the component set in the doors, I located a spot low and forward in the door where the speaker would not interfere with the window crank or mechanism inside the door (with power windows, I could have used 6-1/2" speakers). To keep from having to remove the pocket at the bottom of the door, and to ensure adequate clearance for the magnet assembly on the rear of the speaker, I constructed a pod that fits into the front of the pocket, fills it and provides a mounting surface for the speaker flush with the outer edge of the pocket. Basically, I notched a 2x6 to slip into the pocket, then trimmed the 2x6 to be flush above the pocket. An appropriate sized hole was cut into the 2x6, pocket, and door panel to mount the speaker. The pod was covered in black cloth (didn't have any vinyl at the time), slipped into the pocket, and screws shot in from the back of the door panel to keep it all together. Just in case I used a really deep speaker, I also trimmed the sheet metal in the door behind the new speaker hole. My car had no power windows, so no body to door boots, but the holes were there filled with plastic plugs. Simple matter to drill a hole in the plugs and feed the tape wrapped speaker and power door lock motor wires through (I was also installing and alarm with keyless entry at the time). Eventually, I will obtain the factory wire boots from a GSL to use, but this doesn't look too bad, especially after I tie-wrapped a section of ribbed wire loom to the wires. The only thing to watch for inside the doors is to make sure you wires don't get in the way of the window or door latch mechanisms. It's no fun to jerk the wires off the speaker the first time you roll the windows down!
At this point, all that needs to be done is to put the door panel back on, connect the speaker, and screw the speaker to the pod. I also added a screw at the bottom of the pocket to secure the panel to the sheet metal, since I didn't trust the panel clips to hold the door panel AND the speaker. The tweeters were simply double side taped to the dash , just above and to the outside of the air vents. This is until I have time to modify the A-pillar trim to hold swiveling mounts for the tweets.
Eventually, I would like to have some sort of subwoofer system in the area behind the front seats, but currently, I have a pair of 8" coaxxial speakers mounted for bass and rear fill. there's enough airspace under the panel for anything from a pair of 8's all the way to a pair of small enclosure 12's, or one sub and plenty of room for amplifier(s). Everything is running off of the radio right now, but, again eventually there will be ampage.
I'm working on designing a box that will replace the factory steel panel behind the seats (or storage pockets on 81-85 models), and still look like the panel.I plan to use acoustically transparent carpet a grilles for the subwoofers, so that nothing shows; it will look as stock as possible. The other alternative is to tuck a small sub into the area just in front of the taillights (where Mazda hides the jack on the right side). I have discovered that the 6" Bazooka Bass tube will fit on the left side; not enough for me though. One could also concievably put 8" free-air subwoofers in the rear factory locations - It may require a slight build-out for depth, but there's at least an inch, maybe two, between the plastic panel and the sheetmetal. This would be *real* stealth.
One more option: a plain old tube, hatchback box, or other universal sub or sub/amp combo. I'm actually considering this because I'm going to start autocrossing the car, and it would be nice to be able to remove the unnecessary weight when I need to toss the car around.The only nasty here is that it's in plain sight. Window tint, and black carpeting on the box to blend with the interior may be enough to help hide it, and the alarm should deter some of the lowlifes.
Updates as they happen!